Brake pads are classic wear-and-tear items, yet many drivers only think about them when an MOT tester or dashboard warning light says something is wrong. Minimum brake pad thickness is not just a technical number in a workshop manual; it is directly linked to stopping distance, brake fade and MOT failure risk. Once pads are down to a few millimetres of friction material, temperatures rise faster, braking performance becomes less consistent and the margin between “safe” and “dangerous” shrinks quickly. Understanding what 2–3 mm of pad really means, how it is measured, and when you should budget for replacement puts you in control instead of relying blindly on garages or warning lights.
Factory minimum brake pad thickness: what 2–3 mm really means for MOT and road safety
Most new brake pads on modern cars start life at around 10–16 mm of friction material, depending on the vehicle, brake system and pad type. Once that material wears down, both manufacturers and MOT regulations step in with defined limits. In the UK, the legal minimum for brake linings and pads is a friction material thickness of 1.5 mm; below this, the MOT manual categorises the defect as Dangerous and the vehicle should not be driven. However, almost every manufacturer recommends replacement well before that point, usually at around 2–3 mm. The gap between these numbers is where safety margins, driving style and common sense come into play.
Typical minimum brake pad thickness specifications from BMW, VW, ford and toyota
Factory workshop manuals usually quote a “minimum lining thickness” for each axle. For many mass-market models from BMW, Volkswagen, Ford and Toyota, those values sit between 2.0 and 3.0 mm. For example, a 2018 Mazda CX‑5 front pad specification states a minimum of 2.0 mm, with new pads around 10–12 mm. Many Ford and VW platforms use similar figures, while some BMW and Toyota performance or hybrid variants start thicker (up to 16 mm new) but still consider around 2–3 mm as the change point. Because pad thickness varies by design, you cannot simply say “3 mm means 20% life left” in every case; the only reliable reference is the manufacturer’s service limit in the technical data.
UK MOT brake pad thickness guidelines vs manufacturer service limits
The UK MOT Testing Manual is very clear on brake linings and pads. Under section 1.1.13 Brake linings and pads, pads worn below 1.5 mm of friction material are classified as a Dangerous defect, and pads at or down to a wear indicator are a Major defect. Crucially, MOT testers are instructed to assess visible thickness, contamination and mounting, not to second-guess manufacturer guidelines. A pad may still technically scrape through the MOT brake performance test with good braking force, but if the lining is under 1.5 mm it must fail regardless of performance numbers. Manufacturers, on the other hand, build in additional safety margin; most dealer workshops will advise replacement once pads reach about 3 mm, long before the MOT limit is hit.
Legal vs safe minimum friction material thickness in everyday driving
Running brake pads below about 3 mm is similar to driving on tyres at the legal minimum tread depth. You might pass an MOT, but the real-world safety margin is thin. As pads wear down, their ability to absorb and dissipate heat declines. The backing plate and adhesive layers are exposed to higher temperatures, which can accelerate wear in the last 1–2 mm. At 2 mm of friction material, you are typically one heavy emergency stop or a steep downhill stretch away from metal‑to‑metal contact or severe brake fade. Yes, a pad can still “work” at 1 mm in the sense that the car will stop, but at that point you are into very high risk territory and almost certain rotor damage.
Differences between front and rear axle minimum pad thickness on disc brakes
Front brake pads usually do most of the work and therefore wear faster than rears. Manufacturers sometimes specify slightly different pad thicknesses front and rear even on the same model; for instance, a front set might start at 16 mm new, while rears start at 12 mm. Despite this, the minimum friction material values are often the same (for example, 2 mm front and rear) because that is the thickness required to maintain safe operation and thermal stability. Practically, you are more likely to reach the minimum thickness first on the front axle. That is why many MOT advisories mention “front brake pads low” while rears still have comfortable margin.
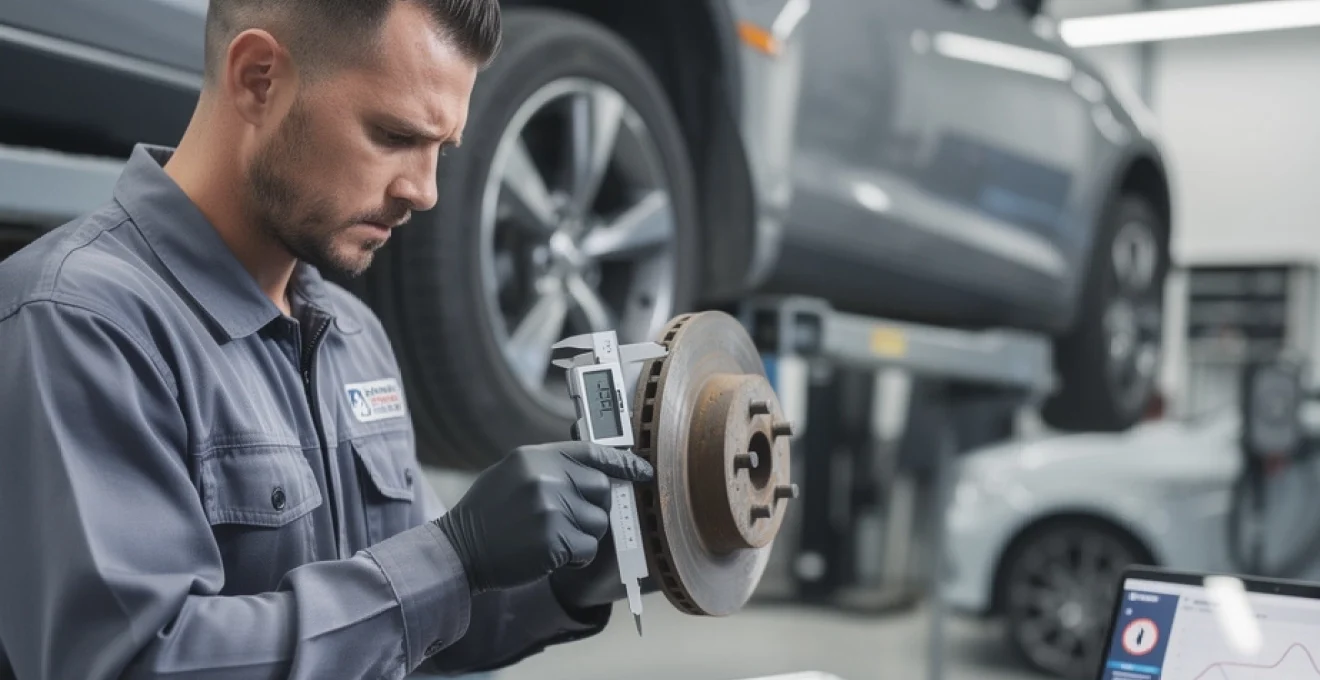
How minimum pad thickness is measured during a professional brake inspection
During a service or MOT, technicians will either visually assess pad thickness through the caliper or remove the wheel for a more accurate measurement. The MOT manual suggests that around 3 mm of visible pad should be present to avoid advisories. For exact values, a brake pad thickness gauge or digital Vernier caliper is placed across the friction material, excluding the steel backing plate. Both inner and outer pads are checked; differences of more than 1 mm between them may indicate seized slide pins or uneven caliper action. Measurements are recorded in the service report, often alongside brake disc thickness and condition, to help predict when pads will reach the practical replacement threshold.
How to measure brake pad thickness accurately with a vernier caliper or brake gauge
If you want to know exactly how much life your brake pads have left, relying on guesswork through the wheel spokes is not enough. An accurate reading comes from either a dedicated brake gauge set or a digital Vernier caliper used correctly. Although garages use workshop lifts and specialist tools, you can still get reliable numbers at home with careful preparation, flat ground and appropriate safety stands. The goal is to separate the friction material from the backing plate and to check both inner and outer pads, because uneven wear is common and can dramatically reduce the remaining safe margin even when one pad still looks healthy.
Visual inspection through the calliper window vs wheel-off assessment
Many modern alloy wheels allow you to peek through the spokes and see the outer pad pressed against the disc. This quick check is useful for spotting obviously worn pads or metal‑to‑metal contact, but it has big limitations. You may only see a portion of the pad, lighting is poor and the inner pad remains invisible. A wheel‑off assessment is significantly more accurate: once the wheel is removed, the outer pad surface and edge are exposed, and the inner pad is often visible through the caliper opening. For precise measurements, the car should be jacked securely on axle stands, the steering turned to full lock where necessary, and the pad edges cleaned of loose dust before using a gauge.
Using a dedicated brake pad thickness gauge (laser, sealey, draper examples)
Dedicated brake pad thickness gauges from brands such as Laser, Sealey and Draper use stepped blades or coloured tabs labelled with mm values. You insert the blade between the pad backing plate and the disc, and the step that contacts the friction material indicates the remaining thickness. These tools are designed to reach tight caliper gaps without removing the pads, making them ideal for quick health checks. Many professional kits use traffic light colours: green (over 6 mm), amber (3–5 mm) and red (under 3 mm). If your pads are in the red zone, it is time to book a replacement; in the amber range you have some life left, but planning ahead for brake work is wise.
Correct use of digital vernier calipers on sliding and fixed calliper systems
Digital Vernier calipers provide more precision, typically down to 0.01 mm. To measure a pad off the car, you simply grip the friction material between the jaws, excluding the metal backing plate. Measuring pads while still fitted is trickier, especially on multi‑piston fixed calipers where access is tight. On sliding calipers, you may be able to hook one jaw behind the backing plate and the other on top of the friction surface. It is crucial to avoid including the backing plate thickness in your reading; otherwise, a pad with 2 mm of friction material might look like 7 mm. Always zero the caliper before use and repeat each measurement to confirm consistency.
Measuring inner vs outer pads to detect calliper slide pin seizure
A common fault on ageing brakes is partial seizure of caliper slide pins. When that happens, the inner and outer pads wear at different rates; sometimes the inner pad can be almost down to the metal while the outer still looks healthy. This is why a thorough inspection always measures both pads on each wheel. If you detect a difference of more than 1 mm between inner and outer pads, the caliper should be stripped, pins cleaned and lubricated, and possibly rebuilt. Leaving a seized slide pin unchecked means that one pad will drop below the minimum brake pad thickness long before the MOT or service interval suggests it is due.
Recording wear measurements for service history and predictive maintenance
Consistently recording pad thickness at every service turns random failures into predictable maintenance. For example, if pads started at 12 mm and are down to 6 mm after 30,000 miles, you can roughly estimate another 30,000 miles before they reach 0 mm. In practice, you would aim to replace them when they reach 3 mm, giving around 15,000 miles of warning. Service records that note “front pads: 5 mm, rear pads: 7 mm” are far more useful than vague comments like “brakes OK”. Over time, you build a picture of wear rate adjusted for your driving style, making it easier to budget and to avoid last‑minute MOT advisories or urgent, more expensive brake work.
Brake pad wear indicators and warning systems on modern vehicles
Modern brake systems go well beyond simple friction blocks. Most vehicles now include some form of brake pad wear indicator, designed to alert you when the friction material is reaching its minimum safe thickness. These range from old‑school mechanical “squealer” tabs to sophisticated electronic sensors integrated into ABS and stability control systems. Understanding how these systems work, and their limits, helps you avoid both unnecessary early replacement and the far more expensive outcome of ignoring warnings until discs and callipers are damaged. It is tempting to rely completely on the dashboard, but no warning system replaces a careful mechanical inspection.
Mechanical wear indicators: squealer tabs and chamfer wear lines
Mechanical wear indicators are simple but effective. A small metal tab is attached to the pad backing plate at a calibrated height, often around 2 mm from the disc contact surface. When the pad wears down to that point, the tab contacts the disc under braking and produces a characteristic high‑pitched squeal. Some pads also feature chamfered edges or grooves in the friction material; when the groove disappears, it signals that the pad is close to its minimum thickness. These mechanical cues are particularly useful on older cars without electronic warning systems, but they do require you to listen carefully and investigate any new brake noise promptly.
Electronic pad wear sensors on audi, Mercedes-Benz, BMW and VAG platforms
Many premium manufacturers such as Audi, Mercedes‑Benz, BMW and other VAG platforms use electronic pad wear sensors. A small circuit embedded in the pad is broken when the friction material wears down to a predefined level, triggering a dashboard message like “Brake pads wear – visit workshop”. Typically, only one wheel per axle is fitted with a sensor, which means that uneven wear on the opposite side could exceed the minimum brake pad thickness without immediately triggering the warning. For that reason, electronic sensors are a helpful safety net, but not a complete substitute for periodic visual or measured checks of all four corners.
ABS and ESP integration: interpreting “check brakes” and brake system warning lights
Electronic brake wear is often integrated with ABS and ESP systems. When certain thresholds are reached or when hydraulic pressure sensors detect anomalies, the car may display generic messages such as “Check brakes” or illuminate a red or amber brake system warning light. These warnings do not always mean pads are below minimum thickness; they can also indicate low brake fluid level, ABS sensor faults or caliper issues. The UK MOT rules treat illuminated brake system warning lights as at least a Major defect, so any persistent warning should be investigated quickly with diagnostic equipment and a physical brake inspection rather than being ignored or reset.
Telematics and dashboard service countdowns linked to pad wear algorithms
Newer vehicles increasingly use telematics and algorithms to estimate pad wear, rather than relying solely on physical sensors. By monitoring factors such as mileage, braking frequency, pedal pressure and temperature, the onboard computer predicts remaining pad life and may display a countdown in miles or days. This approach, already common in high‑end German cars and expanding rapidly across the market, gives you a more nuanced picture of wear than a simple on/off warning. However, it remains an estimate. Aggressive driving, mountain trips or track days can change wear rates overnight, so treating these predictions as guidance rather than an absolute guarantee is the safest approach.
How driving style and conditions affect minimum brake pad thickness margins
Two cars with identical pad thickness today can have wildly different remaining life depending on how and where they are driven. Minimum brake pad thickness figures from the factory assume an average duty cycle; real‑world use is anything but average. A taxi in London, a family SUV towing a caravan and a hot hatch doing occasional track days will all chew through those last 3 mm of friction material at very different speeds. Brake components are designed with significant reserves, but once pads are approaching the manufacturer’s minimum, harsh operating conditions magnify every weakness. Understanding how your own driving profile affects the safe margin helps decide whether 3 mm is “fine for a year” or “should be replaced this month”.
High-speed motorway driving vs urban stop–start and taxi use
Motorway cruising is generally kind to brakes. Once at speed, you use the brakes relatively rarely, and gentle deceleration from 70 mph generates less cumulative heat than constant stop‑start work in town. That is why some high‑mileage motorway cars still have original pads after 60,000–70,000 miles. In contrast, urban delivery vehicles and taxis can wear pads down from 8 mm to 3 mm in a single year. If you mostly commute on dual carriageways and motorways, a pad at 3 mm may have many months of service left. If you spend most of your time in congested city traffic, that same 3 mm can disappear surprisingly quickly.
Towing caravans, trailers and heavy loads: increased pad wear at low thickness
Towing or carrying heavy loads significantly increases the braking energy that pads must absorb, especially at lower speeds and on descents. At full load, front pads in particular can run hotter and for longer, accelerating wear during the last few millimetres of thickness where heat capacity is lowest. If you regularly tow a caravan, horsebox or trailer, it is wise to treat the manufacturer’s minimum pad thickness as an absolute floor, not a target. Many experienced tow‑car owners choose to replace pads proactively at 3–4 mm before a long holiday trip, rather than risking an unplanned brake job or MOT failure midway through the towing season.
Mountain and alpine driving: brake fade risks when pads are near minimum
Long descents in mountainous areas are one of the toughest tests for brakes at the end of their life. Even with engine braking, repeated moderate applications can raise pad and disc temperatures well beyond what they see in ordinary commuting. Thin pads have less thermal mass and poorer heat dissipation, so they reach critical temperatures much faster than new, thick pads. The result is brake fade, longer stopping distances and, in extreme cases, boiling brake fluid. If you plan to drive in Alpine or hilly regions and your pads are already at 3 mm, scheduling a replacement in advance dramatically reduces the risk of experiencing soft, fading brakes halfway down a steep pass.
Track days and performance driving with brembo, EBC yellowstuff and ferodo DS pads
Performance pads such as Brembo, EBC Yellowstuff and Ferodo DS compounds are designed to operate at higher temperatures than typical OE pads, but that does not mean they can be safely run thinner. In fact, serious track drivers often replace pads once they reach 4–5 mm before a circuit event, to maximise heat capacity and avoid taper wear under extreme loads. On track, modern cars can consume several millimetres of material in a single day, especially on heavy front‑engined models. If you enjoy occasional track days, it is prudent to treat 3 mm as below the practical safe minimum and to arrive at the circuit with pads comfortably above that level.
Material-specific minimum pad thickness: organic, semi-metallic and ceramic pads
Not all brake pads are created equal. The friction material compound – organic, semi‑metallic or ceramic – has a strong influence on how pads behave as they approach minimum thickness. While the physical measurement in millimetres is still the key safety factor, the type of pad determines how quickly performance deteriorates and how much heat and abuse the final few millimetres can tolerate. Choosing the right material for your driving profile therefore matters just as much as knowing the theoretical minimum brake pad thickness stated in the manual.
Heat tolerance and fade resistance at low thickness in semi-metallic pads
Semi‑metallic pads (often called semi‑metallic or sintered pads) use a blend of metals such as copper and steel with other binders. They offer strong bite and good fade resistance, making them common on performance cars and heavy vehicles. At low thickness, these pads typically handle heat better than basic organic pads, but they can become increasingly aggressive on discs as the metallic content dominates. Run too thin, they are more likely to score or crack rotors during heavy braking. As a result, many technicians recommend replacing semi‑metallic pads slightly earlier than the legal minimum, especially on vehicles used for fast road or towing.
Ceramic brake pads: low dust, rotor wear and safe minimum thickness margins
Ceramic pads are prized for low dust, quiet operation and reduced rotor wear. They use ceramic fibres and non‑ferrous fillers, which maintain stable friction across a wide temperature range. At low thickness, ceramic pads tend to remain consistent in feel, without the sudden performance drop sometimes associated with cheaper organic pads. However, they are also more expensive, and because they are often fitted to high‑end vehicles driven enthusiastically, they can still deteriorate rapidly once below about 3 mm. The temptation to “get full value” out of premium pads by running them nearly to the backing plate often backfires, as the cost of replacing damaged discs dwarfs the price of changing pads slightly earlier.
OE vs aftermarket pad compounds from bosch, ATE, pagid and mintex
Original equipment (OE) pads from manufacturers such as Bosch and ATE are developed specifically for each vehicle’s brake system, with carefully tuned bite, noise control and wear rate. Aftermarket options from brands like Pagid and Mintex often offer excellent performance and value, but can vary in compound hardness and behaviour near the minimum brake pad thickness. Some aftermarket pads are intentionally softer to protect discs, wearing faster in the final few millimetres. Others are harder and may remain effective right down to 2 mm but risk increased disc wear. Checking technical data sheets and user feedback for your chosen brand helps ensure that the pad’s end‑of‑life characteristics match your expectations.
Interaction between pad thickness and disc rotor minimum thickness (MIN TH) specs
Brake pads do not operate in isolation; discs (rotors) also have a minimum thickness, usually cast or stamped into the outer edge as MIN TH. As discs wear thinner, their ability to dissipate heat falls, and they become more vulnerable to cracking and warping. Running very thin pads on discs already close to their minimum amplifies these problems. For that reason, many garages recommend replacing discs and pads together once either component is near its limit. While it is technically possible to fit new pads to worn but still in‑tolerance discs, combining fresh friction material with borderline rotors often leads to noise, vibration or short service life, undermining the cost saving.
When to replace brake pads: practical thresholds, safety margins and cost trade-offs
Deciding exactly when to replace brake pads is ultimately a risk‑management and cost‑management exercise. Legally, pads must be replaced before friction material drops below 1.5 mm. From a safety and practicality standpoint, most experienced technicians advise treating 3 mm as the real‑world minimum for everyday cars, and 4–5 mm for vehicles used for towing, mountain driving or track days. Replacing pads at around 3 mm usually means that discs can be reused, assuming they are above their own minimum thickness and not heavily scored. Leave pads until 1–2 mm, and the chances of gouged rotors, cracked discs or overheated calipers – and therefore a much larger bill – rise sharply.
One useful analogy is engine oil: nobody sensible waits for the oil pressure warning light before changing oil, even though the engine might technically still run. Similarly, using pad wear indicators and MOT limits as the only triggers for brake work means operating at the edge of safety margins. If your last service report showed 5 mm remaining and you have since covered 20,000 miles of mixed town and motorway driving, assuming a roughly linear wear rate suggests you are likely under 3 mm now. On the other hand, if you added mostly motorway mileage with gentle braking, the same 5 mm might last much longer. Combining measured data with honest reflection on driving style is the most reliable guide.
Cost trade‑offs are also worth considering. In the UK, a typical front pad and disc replacement on a mainstream car often falls in the £250–£400 range at an independent garage and £400–£700 at a main dealer, depending on parts used. Changing only pads at 3 mm while discs are healthy may halve that. However, using cheap, low‑quality pads to save £40–£60 can result in increased disc wear, noise and shorter lifespan, erasing any initial saving. Choosing reputable brands, having pads fitted correctly and brake fluid checked or flushed at the same time delivers better long‑term value than stretching marginal components to their technical limits.
Finally, remember that minimum brake pad thickness is more than just a number on an MOT sheet. At 3 mm you still have functional brakes, but little room for unexpected events: an emergency stop on a wet road, a fully loaded holiday trip or an unplanned detour down a steep hill. Treating 3 mm as the practical replacement point, being especially cautious under demanding conditions, and insisting on proper measurements and documentation during each service gives you predictable, safe braking rather than nasty surprises – and keeps discs, calipers and, most importantly, you out of trouble.