Your engine relies on a finely balanced mix of fuel and air. When that balance is off, even slightly, you feel it as rough running, hesitation, poor fuel economy or a failed MOT emissions test. Fuel injectors sit right at the heart of that process, metering and atomising fuel thousands of times a minute. Once they start to clog, leak or lose electrical control, the whole combustion process suffers. Understanding how to check fuel injectors at home, with sensible precautions, can save you money, prevent misdiagnosis, and help you talk confidently to any garage about the work being recommended on your car.
Key symptoms of faulty fuel injectors in modern petrol and diesel engines
Before you reach for tools, the first step is recognising classic faulty fuel injector symptoms. Rough idling, for example, often shows up as a shaky steering wheel and fluctuating RPM when stationary. Many technicians describe it as the engine “hunting” for a stable speed. Misfires under load, especially during overtakes or on motorway slip roads, can indicate an individual cylinder receiving too little or too much fuel. On modern common-rail diesel and GDI petrol engines, even a slight imbalance between cylinders is enough for the ECU to register a fault and reduce power to protect the engine and catalytic converter.
A noticeable drop in fuel economy is another red flag. Industry data from European fleet operators suggests that partially clogged injectors can cut fuel efficiency by 5–15%, depending on driving style. You might notice more frequent fuel stops, a stronger fuel smell around the exhaust, or visible black smoke under hard acceleration. In some cases, drivers also report a “diesel knock” or sharp ticking noise when one injector is over-fuelling or not atomising properly, particularly on older TDI or HDi units. If these symptoms appear gradually rather than overnight, injector contamination is often more likely than a sudden mechanical failure.
Starting issues provide further clues. Hot-start problems on a diesel, where the engine cranks longer when warm but fires readily when cold, can point to worn nozzles or leaking injector internals that disturb rail pressure. Petrol engines with failing port injectors may crank for several seconds after being left for a few hours, due to fuel pressure bleeding down through a stuck-open injector. Over time, unburned fuel can wash oil film from the cylinder walls and dilute the engine oil, increasing wear. That is why early diagnosis of injector faults is more than just a comfort issue; it is a direct protection for the engine’s long-term health.
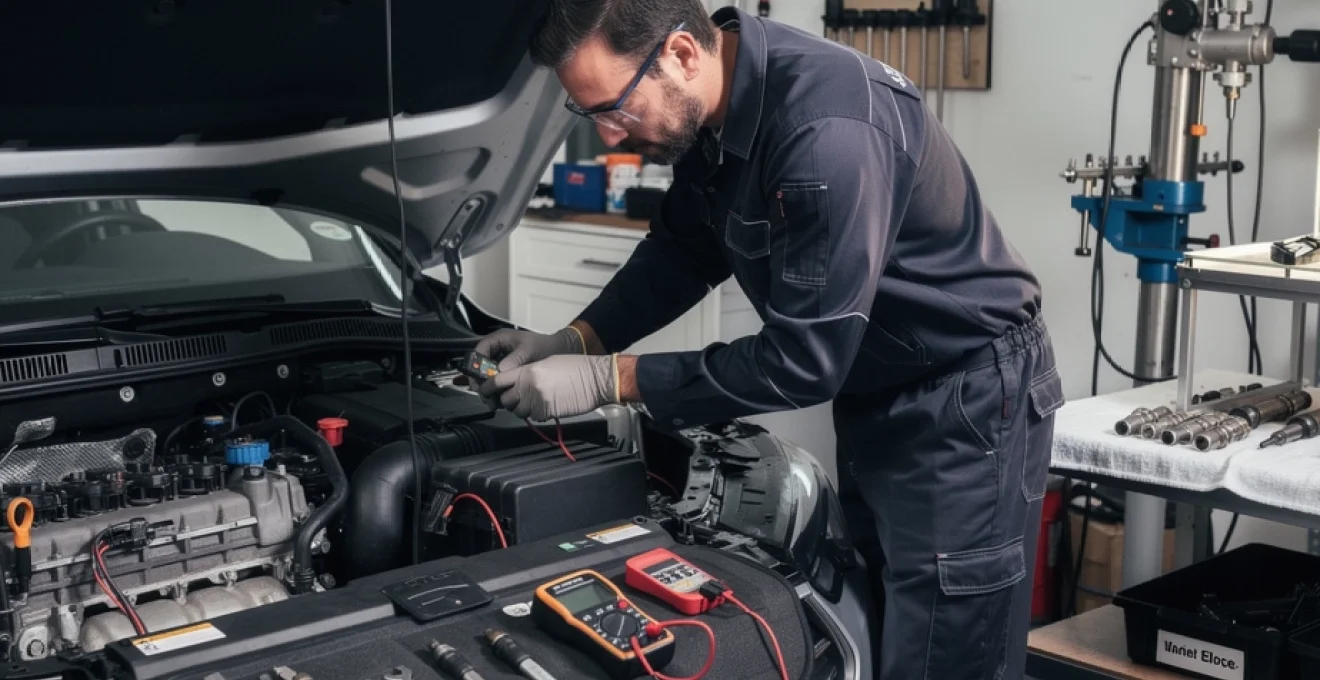
Safety precautions and tools required to check fuel injectors at home
Fuel systems on modern vehicles operate at far higher pressures than older carburettor engines. Common-rail diesels can exceed 1,800 bar (over 26,000 psi), while many GDI petrol systems run 150–350 bar. At these pressures, a tiny jet of fuel can penetrate skin and cause serious injury, so safe working practice is non-negotiable when you check fuel injectors yourself. Static statistics from workshop insurance reports consistently rank fuel-system work among the top five causes of serious garage injuries, largely due to improper depressurisation or incorrect use of tools around high-pressure lines.
Using an OBD2 scanner (e.g. autel MaxiCOM, launch X431) to read injector-related fault codes
Modern engine management makes electronic diagnosis the smartest starting point. An advanced OBD2 scan tool such as an Autel MaxiCOM or Launch X431 allows you to read injector-related fault codes, view live data, and see manufacturer-specific information such as cylinder contribution or correction values. Even an affordable Bluetooth OBD2 adapter paired with a smartphone app can show generic misfire codes like P0301 or P0201, pointing you towards a specific cylinder. Using electronic diagnostics first reduces the need for intrusive testing and helps you distinguish between a truly faulty injector and issues with ignition, compression or air leaks.
When you connect an OBD2 scanner, always follow the manufacturer’s recommended procedure for your car. Some vehicles require the ignition to be in a specific position or the engine to be at operating temperature before live data will populate correctly. You also gain access to freeze-frame data, capturing sensor readings at the moment a fault was logged. If, for example, fuel trims were heavily positive (adding fuel) at the time of a misfire code, that can support the hypothesis of a restricted or partially blocked injector. Combining fault codes with observed symptoms gives you a more reliable diagnosis than either one alone.
Essential hand tools: fuel line wrenches, torx bits, multimeter and noid light
For hands-on checks, a basic but well-chosen toolkit makes the job safer and more efficient. Flare-nut or fuel line wrenches are critical for loosening fuel pipes without rounding expensive fittings. Many injector rails and retainers use Torx or internal hex fasteners, so a high-quality bit set is worthwhile. A digital multimeter capable of measuring low resistance is essential for checking injector coil windings, especially when comparing Bosch, Denso and Delphi units that may have slightly different design specifications.
A noid light is a simple but powerful diagnostic aid for petrol engines. Plugged into the injector harness in place of the injector, it flashes in time with the ECU’s pulse signal. This verifies that the control unit and wiring loom are commanding the injector correctly, allowing you to differentiate between an electrical issue and a mechanical blockage. While not as precise as an oscilloscope, a noid light remains a valuable tool for home enthusiasts and small workshops, especially when combined with scan tool data and resistance measurements.
Personal protective equipment and safe fuel depressurisation procedure
Personal protective equipment should always include safety glasses or goggles, fuel-resistant gloves and appropriate clothing that covers exposed skin. Even on low-pressure port injection systems, residual fuel in the rail can spray several centimetres when a fitting is cracked open. On high-pressure diesel systems, never loosen injector pipes or rail fittings with the engine running. Professional guidance consistently states that high-pressure lines must only be opened after complete depressurisation following the manufacturer’s service procedure.
A typical safe depressurisation process on many petrol engines involves removing the fuel pump fuse or relay, then starting the engine and allowing it to stall as pressure falls. The ignition is then switched off and the battery negative terminal disconnected before any lines are opened. Diesel systems often require a scan tool routine or a specific sequence of steps because of their much higher operating pressures. Working in a well-ventilated area, away from ignition sources, further reduces risk when you check fuel injectors and associated components.
Setting up a clean work area to prevent injector tip contamination
Fuel injector tips and sealing faces are machined to extremely fine tolerances. Even microscopic dirt introduced during removal can cause poor spray patterns, leakage or sealing issues. A clean, organised work surface is therefore a form of protection for your injectors as much as for you. Cover nearby components with clean lint-free cloths, and use caps or plastic bags to protect exposed injector tips as soon as they come out of the rail or cylinder head.
Many experienced technicians treat injector work almost like minor surgery: tools are cleaned before use, and any rags or wipes that might shed fibres are kept away from precision parts. When laying out injectors for inspection, keep them in cylinder order. This makes it easier to correlate any physical damage or deposits with specific misfire codes or cylinder balance data later. Good housekeeping sounds unglamorous, but for tasks involving high-pressure fuel it is one of the simplest ways to avoid creating new problems while solving existing ones.
Electronic diagnostics: using OBD2 live data and multimeter tests on injector circuits
Once basic safety is covered, electronic diagnosis is the most efficient way to check fuel injectors without immediately dismantling the fuel system. Modern ECUs constantly monitor injector performance indirectly via oxygen sensors, knock sensors and crankshaft position data. That information appears as live data streams on capable OBD2 readers, and learning to interpret it allows you to pinpoint subtle injector faults that might not yet trigger a dashboard warning light.
Interpreting short-term and long-term fuel trims to spot injector issues
Short-term fuel trim (STFT) and long-term fuel trim (LTFT) values are among the most powerful tools for diagnosing injector problems. STFT represents moment-to-moment adjustments the ECU makes to keep the air–fuel ratio correct, while LTFT tracks cumulative corrections over time. In a healthy engine using quality fuel, combined fuel trims typically sit between –5% and +5%. When one or more injectors begin to clog, trims may climb to +10% or more as the ECU commands additional fuel to compensate for restricted flow.
Uneven fuel trims between banks on a V6 or V8 engine can indicate a group of injectors being affected, perhaps by contamination in one part of the rail. Industry studies suggest that around 70% of drivability issues logged as “engine running rough” in dealer workshops are eventually traced back to mixture-related problems rather than mechanical failures. Observing fuel trims under different conditions – idle, light cruise, and moderate acceleration – helps you understand whether injectors struggle primarily at low pulse widths (idle) or higher demand, which in turn guides cleaning versus replacement decisions.
Checking injector coil resistance with a multimeter on bosch, denso and delphi units
With the ignition off and battery disconnected, a multimeter set to the appropriate ohms range allows you to measure injector coil resistance. Most modern petrol port injectors from Bosch or Denso fall into the 12–16 Ω range, while many diesel solenoid injectors are lower, often between 0.4–2 Ω. Consult a workshop manual or data source for the exact specification, as Delphi and other suppliers may vary. The key is consistency: significant deviation from the others on the same engine usually signals an internal fault.
To take a reading, disconnect the injector connector and place the multimeter probes across the two pins. A reading of infinite resistance (open circuit) indicates a broken winding. A reading substantially lower than specification suggests partial shorting, which can overload the ECU driver circuit. Even when all injectors read within range, small differences combined with misfire codes can justify more advanced bench testing, especially on high-value common-rail diesel systems where replacement costs are substantial.
Using a noid light to verify injector pulse signal from the ECU
A noid light set matched to your connector style provides a quick visual check that the ECU is sending a switching signal to each injector. After disconnecting the injector and plugging in the light, start the engine. A healthy circuit will produce a rhythmic flashing as the ECU grounds the circuit to open the injector. Lack of flashing suggests a wiring, connector or ECU fault, while an irregular pattern can align with intermittent misfires you may feel while driving.
On engines that will not start, having a helper crank the engine while you watch the noid light can confirm whether the injection system is being commanded at all. Many manufacturers cut injector pulses when certain critical faults are detected (for example, no crankshaft signal), so this test also serves as a cross-check for broader engine management issues. Combining noid light results with resistance testing and fault-code data provides a robust picture of electrical integrity before you consider mechanical injector cleaning or replacement.
Identifying wiring loom faults and poor grounds that mimic injector failure
Electrical problems can easily masquerade as bad fuel injectors. Broken wires inside the loom, loose pins in connectors, or corroded engine grounds can all interrupt injector control. Visual inspection often reveals rub-through points where the loom has been resting against sharp brackets or hot exhaust components. Gently tugging on individual wires at the connector can expose intermittent faults that only appear with vibration or engine movement.
Voltage-drop testing is a more advanced but powerful technique. By measuring voltage between the battery and injector while the circuit is active, you can locate high-resistance joints or poor earth connections. Professional experience suggests that on older vehicles, up to 30% of injector “failures” reported by drivers are actually wiring or connector issues. Taking the time to verify harness integrity avoids replacing expensive parts unnecessarily and improves long-term reliability once a genuine electronic issue is corrected.
Mechanical checks: fuel pressure, leak-down testing and spray pattern inspection
When electronic diagnostics point towards fuelling problems, mechanical checks help determine whether the fault lies with injectors, pumps or pressure regulators. These tests are more hands-on and may require specialist gauges or adapters, but they reveal how the physical fuel system behaves under real conditions. Mechanical data is particularly important on common-rail diesel engines, where injector leakage or rail pressure faults can cause limp mode, hard starting or excessive smoke even when electrical tests appear normal.
Measuring rail pressure with a fuel pressure gauge on common rail diesel systems
A high-quality fuel pressure gauge, designed for diesel pressures and fitted with the correct adapters, allows direct measurement of rail pressure. Manufacturer specifications vary, but many modern diesels idle around 250–350 bar and reach 1,500–1,800 bar under heavy load. Deviations outside tolerance at idle or during a controlled acceleration test can indicate a weak high-pressure pump, blocked filter, faulty pressure regulator, or injector leakage back to the return line.
Because of the extreme pressures involved, always follow official procedures and never loosen fittings to “see if fuel comes out”. According to recent training material from several OEMs, misdiagnosis of common-rail components remains a major cost driver in warranty claims, with parts often replaced in chains. Careful pressure testing, combined with leak-off measurements, is the most reliable way to avoid unnecessary replacement of expensive pumps or rails when individual injectors are the real culprits.
Performing an injector leak-off test on TDI, HDi and CDTi engines
An injector leak-off (or back-leak) test measures how much fuel returns from each injector to the tank over a set period. Special calibrated tubes plug into each injector’s return connection. With the engine idling or cranking, fuel is collected and compared between cylinders. On a healthy set, volumes are closely matched; a significantly higher return on one injector means internal wear or damage, allowing fuel to bypass the nozzle and reduce effective rail pressure.
Leak-off testing is widely used on TDI, HDi, CDTi and similar common-rail systems because it is relatively quick and does not require removing injectors from the engine. Fleet maintenance statistics suggest that regular leak-off assessments on high-mileage diesels help identify weak injectors before they cause hard starting or DPF regeneration problems. When combined with OBD2 data showing cylinder-specific corrections, leak-off results provide strong evidence for refurbishing or replacing individual injectors rather than the entire set.
Observing injector spray pattern and atomisation on a test bench
For the most detailed assessment of injector health, specialist workshops mount injectors on a dedicated test bench. This controlled rig pressurises the injector and fires it into a transparent chamber so the spray pattern, atomisation and flow rate can be observed and measured. A good injector produces a fine, even cone of mist; a faulty one may show streaks, dribbles or uneven fans of fuel that lead to poor combustion in the cylinder.
Bench testing also quantifies flow rate at different pulse widths, simulating idle, cruise and full-load conditions. An injector that flows 5–10% less than specification may still allow an engine to run but with reduced performance and increased emissions. Independent test labs report that on vehicles with over 100,000 miles, it is common to find one or two injectors flowing noticeably less or more than the others, even when no dashboard warning is illuminated. Accurate bench data then guides targeted cleaning, refurbishment, or replacement.
Diagnosing sticking, clogged or dripping injector nozzles by cylinder balance
Cylinder balance tests, accessible via some advanced scan tools, show how much the ECU has to adjust fuelling for each cylinder to maintain smooth running. Large corrections for a particular cylinder often point to a sticking or clogged injector. In extreme cases, a dripping nozzle may cause that cylinder to run rich at idle and lean at higher RPM, resulting in confusing symptoms like rough idle but seemingly normal power at speed.
On engines where electronic cylinder balance data is not available, a more traditional method involves disabling injectors one by one and observing RPM drop. Each healthy cylinder should cause a similar change; a smaller drop suggests that cylinder was already contributing less power. This approach must be carried out carefully to avoid unburned fuel damaging the catalytic converter, so it is better suited to trained technicians. Nevertheless, it illustrates how injector behaviour directly affects engine smoothness and vibration.
Specific procedures for petrol port injectors vs direct injection (GDI, FSI, TSI) systems
Not all fuel injectors operate in the same environment. Traditional multi-point injection (MPI) systems spray fuel onto the back of the intake valves at relatively low pressure, while modern direct injection (GDI, FSI, TSI, EcoBoost and similar) injectors fire straight into the combustion chamber at very high pressure. These different architectures require adapted diagnostic approaches and create distinct failure patterns. Understanding which type of system your car uses is the starting point for effective injector testing and maintenance planning.
Checking port fuel injectors on older MPI engines (e.g. toyota 1NZ-FE)
On older MPI engines like Toyota’s 1NZ-FE, access to port injectors is often easier, making them more DIY-friendly to test. Electrical checks with a multimeter and noid light follow the general principles outlined earlier. Mechanically, low-pressure systems (often around 3–4 bar) allow safe use of standard fuel pressure gauges once the system is depressurised. Many enthusiasts use an automotive stethoscope or even a long screwdriver as a listening probe to hear the characteristic clicking of each injector while the engine idles.
For suspected clogging, off-car ultrasonic cleaning combined with flow testing is a popular option. In controlled tests, professional cleaning has been shown to restore up to 90% of lost flow on mildly contaminated port injectors. Because these injectors sit in the intake port rather than the combustion chamber, they are less exposed to heat and carbon, so outright mechanical failure is relatively rare compared to GDI types. Regular use of high-quality fuel and occasional injector cleaner additives can significantly extend service life.
Diagnosing high-pressure injectors on GDI engines (e.g. VW TSI, ford EcoBoost)
GDI injectors work at far higher pressures and endure harsher conditions, protruding directly into the combustion chamber. On engines such as VW’s TSI or Ford’s EcoBoost, misfires at idle, cold-start rattles and fine soot deposits around the injector body can point to sealing issues or poor spray patterns. Because of the high pressures (often 150–350 bar for petrol direct injection), mechanical testing usually requires specialist equipment and procedures beyond the scope of most home garages.
Electronic checks remain valuable, however. Monitoring high-pressure rail data via OBD2 while performing controlled acceleration can indicate whether the high-pressure pump and injectors are maintaining target pressure. Excessive correction or pressure drop under load may suggest leakage or flow restriction. Some manufacturers also provide injector compensation codes that must be programmed into the ECU after injector replacement, reflecting precise flow characteristics, so any DIY work on GDI injectors must be carefully coordinated with suitable diagnostic tools.
Carbon build-up issues on intake valves and their impact on injector performance
One particular challenge with many GDI engines is intake valve carbon build-up. Because fuel is injected directly into the cylinder rather than onto the back of the valve, the natural “washing” effect of petrol is lost. Over time, oil vapour from the crankcase ventilation system can coke onto intake valves, restricting airflow and disrupting swirl patterns. While this is not an injector fault in itself, it can create symptoms that closely resemble injector problems: hesitation, misfires at low RPM and reduced fuel economy.
Think of the intake tract as a set of lungs; if the passages are narrowed or roughened with deposits, air cannot flow smoothly, and even a perfectly functioning injector cannot compensate. Various cleaning methods exist, from chemical treatments to walnut-shell blasting, and recent design changes by manufacturers aim to reduce this build-up. When diagnosing GDI issues, considering valve cleanliness alongside injector condition prevents tunnel vision and helps maintain realistic expectations about what injector cleaning alone can achieve.
Testing high-pressure pumps and rails alongside injectors on direct injection systems
On both GDI petrol and modern diesel engines, the high-pressure pump and rail are integral parts of the overall injection system. A weak pump that cannot sustain demand at higher RPM may cause surging, limp mode or fault codes that initially appear to implicate injectors. Conversely, a sticking pressure control valve on the rail can generate erratic pressure readings, confusing automated diagnostics. That is why professional injector testing on direct injection systems almost always includes concurrent evaluation of pump performance and rail stability.
Advanced diagnostic routines may involve commanded pump volume tests, where the ECU requests specific pressures and the response time is measured. Industry training events over the last few years have placed increasing emphasis on system-level thinking: instead of swapping injectors at the first sign of trouble, technicians are encouraged to view the high-pressure circuit as a whole. For an enthusiast, the key takeaway is that injector checks on GDI and common-rail engines should never be isolated from broader fuel-system assessment if long-term reliability is the goal.
When to clean, refurbish or replace fuel injectors: costs, options and reliability
Deciding whether to clean, refurbish or replace fuel injectors comes down to a blend of diagnostics, cost and risk tolerance. For mildly contaminated port injectors on a well-maintained petrol engine, professional ultrasonic cleaning with flow testing is usually cost-effective. Industry figures suggest typical cleaning costs are 20–30% of new injector prices, yet can restore lost performance and fuel economy in many cases. Periodic use of quality fuel additives, especially before MOT emissions tests, can also help keep injectors and combustion chambers cleaner between more intensive services.
On high-pressure diesel and GDI injectors, cleaning alone is less often a complete solution. Internal wear, erosion from poor-quality fuel, and damage to precision nozzles may not respond to cleaning. Refurbishment by a reputable diesel or injection specialist, including replacement of internal components and recalibration, can be a strong middle ground. Data from major diesel remanufacturers indicates that properly refurbished common-rail injectors can match or exceed the reliability of new units when installed and coded correctly, often at 50–60% of the cost of brand-new parts.
Outright replacement is generally recommended when injectors exhibit severe leakage, cracked bodies, burned coils, or fail to meet flow specifications even after refurbishment. On some engines, manufacturers update injector part numbers over time to address known issues, so new injectors may also incorporate design improvements. When budgeting, it is worth considering ancillary costs such as new sealing washers, clamp bolts and coding procedures. A phased approach can sometimes work: replacing one or two clearly faulty injectors, then monitoring fuel trims and cylinder balance to determine whether further action is needed over time.
From a reliability perspective, viewing injectors as serviceable components rather than “fit-and-forget” parts aligns with how modern engines are actually used. Short journeys, urban stop–start conditions and extended oil-change intervals all increase deposit formation and stress on injection systems. By paying attention to early signs – rough idle, poorer fuel economy, hard starts or emissions warnings – you give yourself the best chance to check fuel injectors methodically and choose the most economical remedy before problems escalate into more extensive engine damage.